• Home
  • About
  • Recipe Index
  • Contact
    • Email
    • Facebook
    • Google+
    • Instagram
    • Pinterest
    • RSS
    • Twitter
    • YouTube

A Healthy Life For Me

Cooking, Gardening and Living a Healthy Life

  • Recipe Index
    • Appetizers
    • Beverages & Cocktails
      • Smoothie
      • Cocktail
    • Breakfast & Brunch
    • Main Dishes
      • Beef
        • Beef {Gluten Free}
        • Beef {Paleo}
      • Bison
        • Bison {Gluten Free}
        • Bison {Paleo}
      • Chicken
        • Chicken {Gluten Free}
        • Chicken {Paleo}
      • Seafood
        • Shellfish
        • Whitefish
        • Redfish
        • Other
      • Pork
        • Pork {Gluten Free}
        • Pork {Paleo}
      • Turkey
        • Turkey {Gluten Free}
        • Turkey {Paleo}
    • Desserts
      • Bars & Brownies
      • Cookies
      • Cupcakes & Cakes
      • Pies & Tarts
    • Pasta
    • Salads
    • Side Dishes
    • Soups & Stews
  • Specialty Diets
    • Gluten Free
    • Paleo
    • Dairy Free
    • Vegetarian
  • Fitness
  • Gardening
    • My Garden
    • My Backyard chickens
    • My Backyard Honey Bees
You are here: Home / Gardening / My Garden / Tips for Starting Seeds Step 3 {transplanting}

Tips for Starting Seeds Step 3 {transplanting}

9 Aprby Amy3

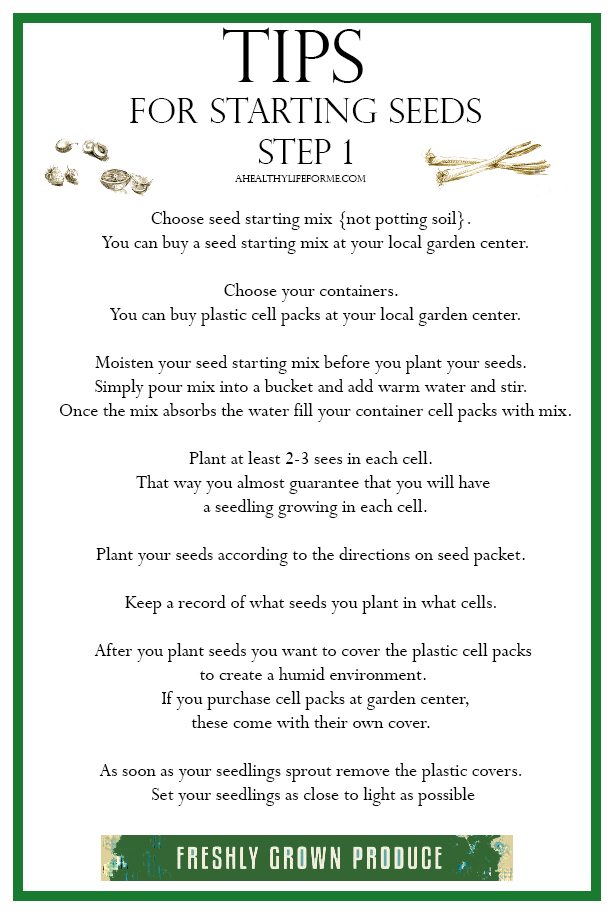
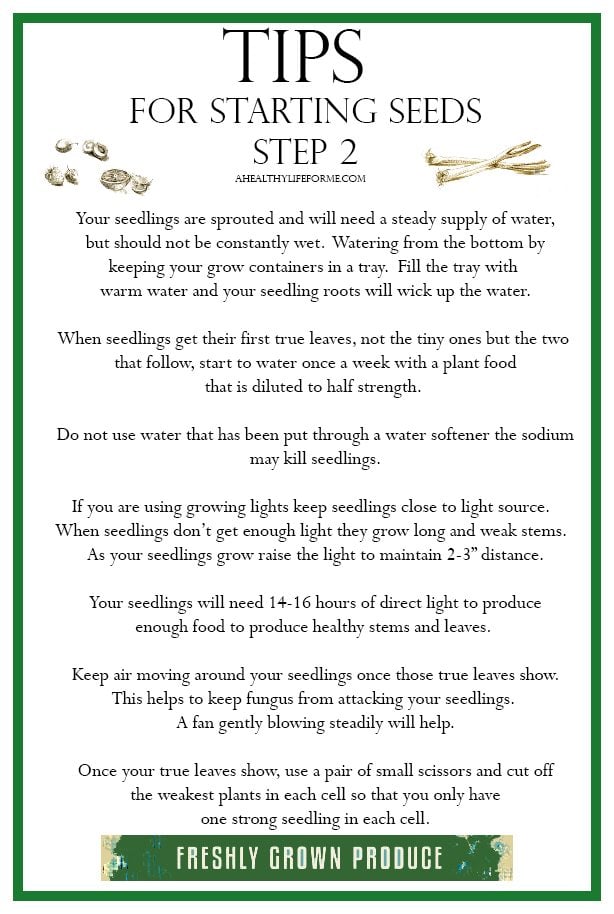
You started your seeds and you have been caring for your seedlings. Now what?  My Tips for Starting Seeds Step 3 {Transplanting} will answer your questions and help you have a successful transplant.   If you haven’t planted your seedlings yet and are here reading this post, go to my Tips for Starting Seeds Step 1 {Planting} to help you get started.

Follow me on Bloglovin | Instagram | Pinterest | Twitter

Tips for Starting Seeds Step 3 Transplanting | ahealthylifeforme.com

You have little seedlings that are ready to head out into the big ol’ world.  They look strong and healthy, keep them that way by slowly introducing them to the trials of mother nature.  Gardeners call this hardening off giving your plants  a bit of the outdoors in small chunks of time, until they are ready to be out there all day.  At the end of this hardening off leave them out overnight and if they look strong and healthy the next day, get to transplanting.

After you transplant your babies, pay attention to the weather channel.  If the weatherman starts talking about high winds, hail or terential rainstorms, you might want to give your babies a bit of protection.  You can use overturned pots, cardboard boxes, or an old sheet set on stakes.  Nothing fancy, just a buffer.

Tips for Starting Seeds Step 3 {Transplanting}:

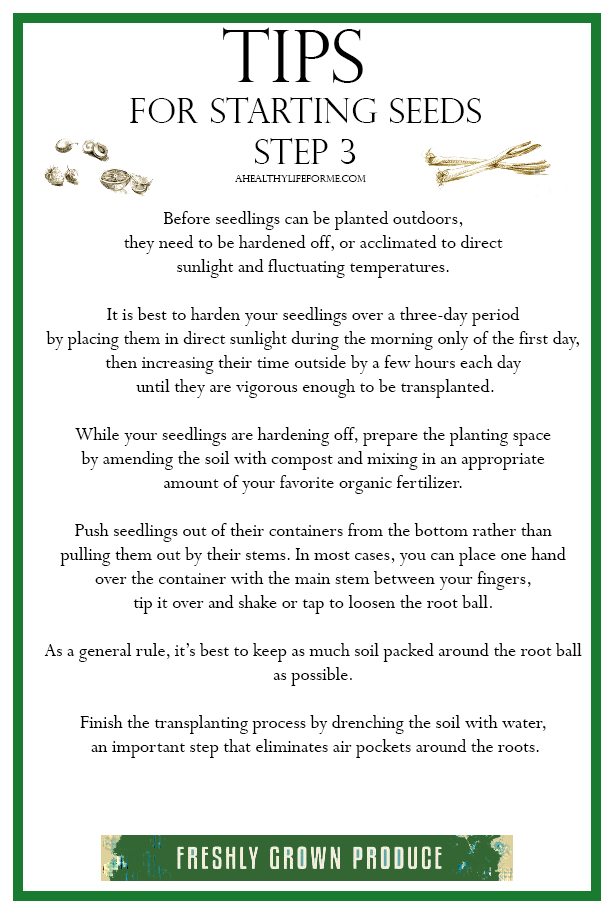
  • Before seedlings can be planted outdoors, they need to be hardened off, or acclimated to direct sunlight and fluctuating temperatures.
  • It is best to harden your seedlings over a three-day period by placing them in direct sunlight during the morning only of the first day, then increasing their time outside by a few hours each day until they are vigorous enough to be transplanted.
  • While your seedlings are hardening off, prepare the planting space by amending the soil with compost and mixing in an appropriate amount of your favorite organic fertilizer.
  • Push seedlings out of their containers from the bottom rather than pulling them out by their stems. In most cases, you can place one hand over the container with the main stem between your fingers, tip it over and shake or tap to loosen the root ball.
  • As a general rule, it’s best to keep as much soil packed around the root ball as possible.
  • Finish the transplanting process by drenching the soil with water — an important step that eliminates air pockets around the roots.


Tips for Starting Seeds Step 3 Transplanting | ahealthylifeforme.com


Don’t miss:

Tips for Starting Seeds Step 1 {Planting}

Tips for Starting Seeds Step 1 | ahealthylifeforme.com

Tips for Starting Seeds Step 2 {Growing}

Tips for Starting Seeds Growing | ahealthylifeforme.com

Related

You Might Also Like

  • Columbine ‘Aquilegia’
  • How to Make Rosemary Oil
  • Tips for Growing Carrots and Honey Roasted Carrot Recipe
  • Peas, Peas, Everywhere!

Under: My Garden 3 Comments

« Blueberry Vinaigrette {paleo + gluten free}
Vietnamese Shrimp Edamame Salad »

Comments

  1. Ronnie says

    April 9, 2015 at 6:11 am

    What is your favorite brand(s) of “organic” fertilizer? PLEASE don’t say Mirical-Gro…though they do make an organic line, in my opinion they are just cashing in on the trend of organics.

    Reply
    • Amy Stafford says

      April 9, 2015 at 7:16 am

      Ronnie,
      I have used Jobe’s Organics or Espoma Organic Garden-tone. Both are available at my garden center.

      Reply
  2. Erin @ Miss Scrambled Egg says

    April 10, 2015 at 7:00 am

    Amy – I can’t wait to start my garden this year. I love these tips. 😀

    Reply

Leave a Reply Cancel reply

This site uses Akismet to reduce spam. Learn how your comment data is processed.

Hi There!

Hi, I am Amy, food photographer, recipe developer, food lover, organic garden maven, fitness nut and lover of Airedales. Please stay a while and explore. More >>

  • gluten free
  • paleo
  • menu plan
  • fitness

Subscribe

Never miss a recipe! Subscribe to have new recipes and updates delivered straight to your inbox!

facebook instagram pinterest

Categories

Archives

Seasonal

Seasonal Eats

DIY Egg Shell Planters

Gluten Free Almond Coconut Cake Recipe | ahealthylifeforme.com

Gluten Free Almond Coconut Cake

Easter Menu Ideas | ahealthylifeforme.com

Elegant Easter Menu

How to Grow and Care for Yarrow

Oregano Pesto Recipe | ahealthylifeforme.com

Oregano Pesto

Copyright © 2022 · Blogger Boutique

Copyright © 2022 · Healthy Theme on Genesis Framework · WordPress · Log in